Wednesday, January 30, 2008

Scalloped Edges tutorial update...

I have noticed quite a bit of traffic coming in for my little old tutorial on Scalloped Edges.
Here’s an update on how to get it even (more or less) on each side.

Don't forget to leave comments/thoughts! It helps me to know what to work on!!

Here's the link to my original tutorial Scalloped Edges.
* 2/19/08 - How do you do that? A guide to removing the guard off your punches.


What you want to do is figure out where the center of your project is.
Photobucket

Don't forget to take that guard off of your punch! I am using the Stampin' Up! 3/16" Corner Rounder with the guard removed.

Carefully go across one side of your cardstock or paper.
Photobucket
Take care not to punch all the way through the paper or you will create a "notch" in the paper.

When you are done on one side, go across the other way starting again at the center of your project. When you are done, you should be fairly even on each side.
Photobucket

It gets easier with practice. Believe me... I was doing this at 3 in the morning today and after the 10th time, I had it down just right!

Check out the card I made for the SC161 challenge! I posted it next...

A Good Egg

That name for the stamp set cracks me up! lol!

Well I finally did it! I jumped in and did a SCS Sketch Challenge. SC161
Here's what I came up with:

Easter

The egg is stamped in Chocolate Chip on Berry Bliss DSP (the one with pink spots on white). I stamped the flowers with the polka dots over the stamped egg and then trimmed it out. On another sheet from Berry Bliss (pink flowers on pink) I stamped the zig zag pattern in Close to Cocoa and trimmed that out and mounted it onto the egg.

Using the Tombo Multi Liquid Glue, I added the micro-beads to the outside edge of the zig zag pattern.

If you look closely, you will see that the pink strip of DSP has been stamped over in Pretty in Pink with the flower and polka dot stamp.

I finished it off with some scalloped edges and ribbon treatment.

Cheers!
Jane

Monday, January 28, 2008

Holding my breath...

Will my little sister get her big package in the mail today?
I am holding my breath in anticipation! Will she like it? Will she be surprised that it's me? Does she already know who I am?

Here's what I sent her...

Photobucket

Each of the above items were individually bundled up. Can you guess which one holds my business card as the final reveal? :)

Here's the card I made for her:

Photobucket

Stamps: Hostess set Infinite Goodness, Curvy Verses, Watercolor Vine Jumbo wheel
Paper: Kraft, Barely Banana, Wild Wasabi, Textured Wild Wasabi
Ink: Wild Wasabi
Accessories: White Gel pen, 1- 1/4" Square punch, 1-3/8" Square punch, Wild Wasabi Double-Stitched ribbon

Here are close-ups of what I sent my little sister:

Photobucket

Photobucket

Photobucket

Photobucket

In that big box, I also put 3 extra mailboxes from Target. One of each color... red, white, and pink. There were mini Valentine pails so I put a couple of those in there for her to play with as well. I found some yummy chocolates for her "boys" and kissables for her daughter. I think that's it. I'm so excited! I can't wait for her to post. I hope she gets it today!

Off to take the Country Lane Elementary School tour this morning.
I can not believe my son will be starting Kindergarten in the fall!
Then it's off to the dentist. Thank goodness Kevin is able to stay home with Keiji while I can do all this! Then I pick up the Ken from preschool and drop the boys off with my in-laws so that I can pick up my friend, Kristin, and take her out to tea at Lisa's Tea Treasures.
Then finally, I pick up the boys and rush home so that I can prep for a workshop this evening.
Phew! Crazy day! Anyone else having a busy Monday?

Saturday, January 26, 2008

You've Got Mail!

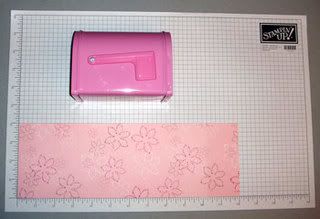
Have you been to the dollar section at Target lately? Have you seen the adorable little mailboxes that come in red, pink, or white? They are a dollar each! I altered one for my little sister for Valentine's. Here's how I put it together:

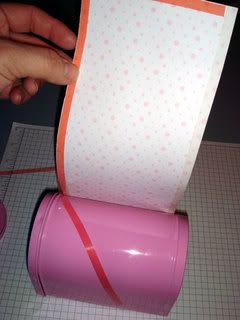
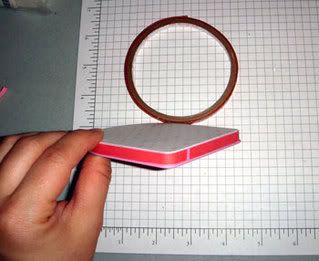
Step 1: Cut a Designer Series Paper (Berry Bliss #110749 - page 169)) 4" x 12". It fits right in between the raised grooves of the mailbox.

Photobucket

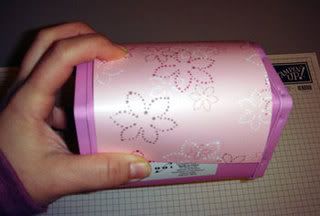
Step 2: Hold one end of the paper at the bottom half of the mailbox and bring it up along the side.

Photobucket

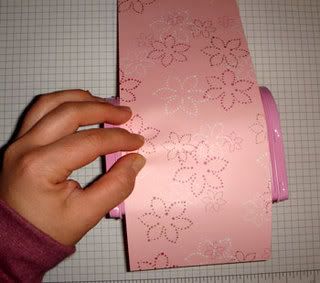
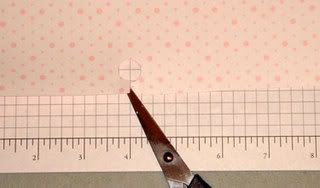
Step 3: Carefully pinch the area around the base of the flag so that you create an imprint of the circle that is at the base.

Photobucket

Step 4: Take the paper off of the mailbox and set it down on the table. Take a 1/2" Circle punch (#104390 - page 180) and punch out the impression you made.

Photobucket

Step 5: Take your Paper Snips (#103579 - page 184) and cut a slit from the bottom of the paper to the punched circle.

Photobucket

Step 6: Turn the paper over and adhere Sticky Strip tape (#104294 - page 186) to all four sides of the paper.

Photobucket

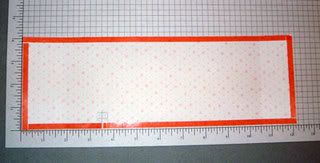
Step 7: Peel and cut off about 2" of Sticky Strip tape from around the punched circle.

Photobucket

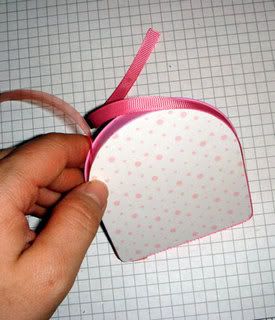
Step 8: Carefully slide it under the base of the flag. Tug and pull until it fits snugly around the base.

Photobucket

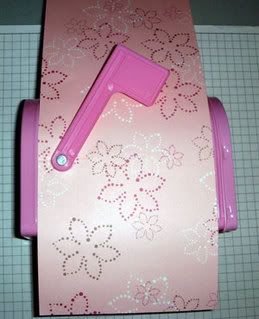
Step 9: Pull up one end of the paper and peel the red protective tape off. Carefully adhere the paper to the mailbox.

Photobucket

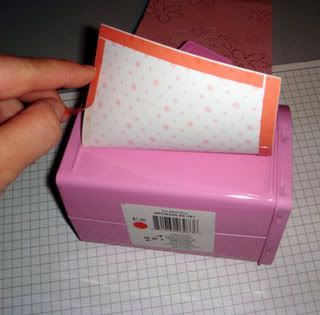
Step 10: Turn the mailbox over to the other side and pull up the paper. Peel off the red protective tape and carefully adhere the paper to the mailbox.

Photobucket

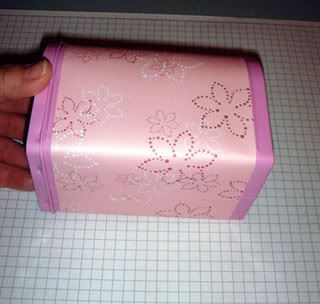
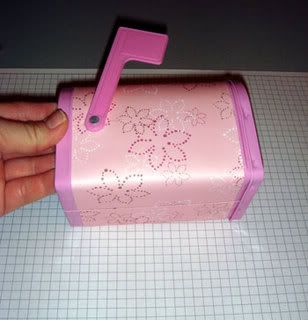
Step 11: When you are done, you should have a mailbox that look like this:

PhotobucketPhotobucket

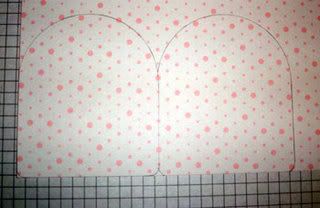
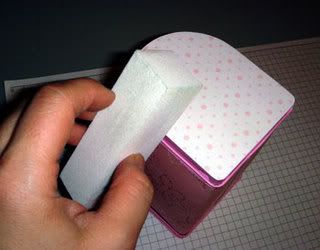
Step 12: Remove the front lid of the mailbox. On a different coordinating patten of Designer Series Paper, trace the lid on the paper. Cut the traced lids. It will help to trim the lids inside the lines (opposed to outside the lines). Using the Tombo Multi Purpose Adhesive (#110755 - page 186) glue the paper down to the lids. Be sure to put the glue on the backs of the paper you want to use!

Photobucket

Step 13: Run Sticky Strip tape along the sides of the lids.

Photobucket

Step 14: As you peel off the red protective tape, begin to adhere the ribbon .

Photobucket

Step 15: If the sides of the paper are a bit off the lids, use Sanding Blocks (#103301 - page 184) to sand down the edges.

Photobucket

Finished mailbox:
Photobucket

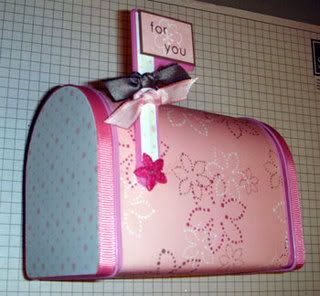
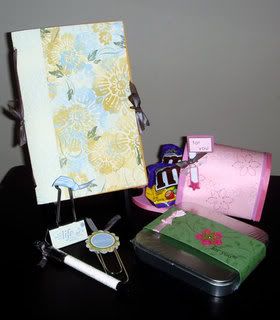
What I made for my little sister:
Photobucket

Friday, January 25, 2008

I've been tagged.... again!

I was tagged by Laura A Life and Art in Progress.

1. I have a new hairdo! Woo hoo! I took the boys in for a much needed haircut this morning and as I was waiting for them to get done, I asked if they would cut my hair. I let her have her way with my hair. What do you think?
Photobucket
2. I donate my hair to Locks of Love. It will have to wait another year, but at least they will be getting freshly cut hair this time! I will take better care of it this round.
PhotobucketPhotobucket
BTW, that's baby powder floating around the camera in the first picture. Ken took the picture after he had doused himself in baby powder. LOL!
3. I like to multi-task and run a very tight deadline when it comes to getting things done.
4. I don't like pizza but am surrounded by pizza lovers. My boys will eat pizza morning, noon, and night if they could. Blah!
5. I have 3 pairs of shoes that I wear regularly. My tennis shoes, my boots, and my wooly slip ons. Very sad.
6. I learned to drive in 1997 and totaled my first and only car in 2006. It was paid in full off the lot too! Bummer. I was entering an intersection when someone made an unprotected left turn just as I crossed the crosswalk. I tried to swerve to my left to avoid him but still ended up hitting him somewhere between his passenger and rear passenger door. It was like hitting a brick wall. I was lucky my boys were unhurt. I ended up having to have a root canal from the punch of the airbag. Xrays now show extensive trauma to my neck and spine which chiropractic therapy will eventually help straighten out. I'm just grateful we were able to walk away from the accident and even more grateful for the help and the support we received on that corner.
Car
7. I love to bowl and my highest game so far is a 289. I had 10 strikes in a row and the 11th ball was the best of them all... left a ten pin up, which I managed to knock down with everyone staring at me during the tournament. That was so cool! My husband, Kevin, has a perfect 300 game! He bowled that during a tournament too. :)

I tag:
Amy - Familia Bencomo
Lisa - so-muchlove


Thinking of you, Bean!
Sending all our love to the Davey Family.

Wednesday, January 23, 2008

Big Sister Julie!

I would like to introduce everyone to my Big Sister, Julie (a.k.a. jeweleintn - SCS) who has been treating me to her wonderful cards over the past few months. Today, I received a big box full of treats and the big reveal! I had NO idea that she was my Big Sister this whole time! What a sneaky sister!

Along with a sample stack of fun glitter and some felt flowers to play with, I received:
PhotobucketPhotobucket

To show you a sample of Julie's talent:
PhotobucketPhotobucket

The tall tin was full of yummy chocolates. Yes... was... I ate most of it during the time it took for me to take the pictures and upload them on my computer. :)

Julie was also sweet to remember my boys:
PhotobucketPhotobucket

From the bottom of my heart... THANK YOU, Julie!

But wait... that's not all!

One of the cards that Julie shared with me was published in CARDS Magazine this month!
CONGRATULATIONS, JULIE!
Read more about it on her beautiful blog: Rubber Room Ramblings

Friday, January 18, 2008

Rainbow Bridge for Poppi

My mother called me at 7:30p to let me know that our cat of 20 years had just passed away quietly. Poppi was the runt of a huge litter at the SF SPCA when I had turned 16. My parents decided to take care of her when I moved to Los Angeles. They pampered and spoiled her so I know Poppi lived a very happy and content life with them. I am grateful for that. I wish she lived long enough for our trip up to the city tomorrow. We knew that she was not going to be around for much longer. I guess I was hoping for one last chance to hold her in my arms.

Photobucket

Rainbow Bridge Poem
Just this side of heaven is a place called Rainbow Bridge.
When an animal dies that has been especially close to someone here, that pet goes to Rainbow Bridge. There are meadows and hills for all of our special friends so they can run and play together. There is plenty of food, water and sunshine, and our friends are warm and comfortable. All the animals who had been ill and old are restored to health and vigor. Those who were hurt or maimed are made whole and strong again, just as we remember them in our dreams of days and times gone by. The animals are happy and content, except for one small thing; they each miss someone very special to them, who had to be left behind.
They all run and play together, but the day comes when one suddenly stops and looks into the distance. His bright eyes are intent. His eager body quivers. Suddenly he begins to run from the group, flying over the green grass, his legs carrying him faster and faster.
You have been spotted, and when you and your special friend finally meet, you cling together in joyous reunion, never to be parted again. The happy kisses rain upon your face; your hands again caress the beloved head, and you look once more into the trusting eyes of your pet, so long gone from your life but never absent from your heart.
Then you cross Rainbow Bridge together…
– Author Unknown

Tuesday, January 15, 2008

What "Jane" means...

What Jane Means
You are fair, honest, and logical. You are a natural leader, and people respect you.You never give up, and you will succeed... even if it takes you a hundred tries.You are rational enough to see every part of a problem. You are great at giving other people advice.
You are usually the best at everything ... you strive for perfection. You are confident, authoritative, and aggressive. You have the classic "Type A" personality.
You are very intuitive and wise. You understand the world better than most people.You also have a very active imagination. You often get carried away with your thoughts.You are prone to a little paranoia and jealousy. You sometimes go overboard in interpreting signals.
You are friendly, charming, and warm. You get along with almost everyone.You work hard not to rock the boat. Your easy going attitude brings people together.At times, you can be a little flaky and irresponsible. But for the important things, you pull it together.

Sunday, January 13, 2008

Happy Stampin' Day!

It's Hostess Club Workshop day, today and tomorrow!

Here's what I have in store for everyone!

Happy Heart M & Ms!
Photobucket

* Happy Heart Day stamp set #111089
* Classic Ink pads: Pretty in Pink, Regal Rose, Real Red, Basic Black
* Aqua Painter
* Large Tag punch #105934 and Small tag punch #108264
* Red gingham ribbon #104827
* Textured Real Red card stock - 2" x 3-3/8"
* Whisper White card stock - 2" x 3-1/4"
* Small cellophane bags
* Valentine M&M's
* Stapler

Happy Heart Day!
Photobucket

* Happy Heart Day stamp set #111089
* Classic ink pads: Basic Gray, Bordering Blue, Regal Rose, Certainly Celery
* Berry Bliss Designer Series #110749 - 2" x 2-5/8" (need 2 of each design)
* Whisper White card stock #100730 - 2-3/4" x 3"
* Pretty in Pink card stock #100459 - 5-1/2" x 8-1/2" and 2-7/8" x 3-1/8"
* Close to Cocoa card stock #101341 - 3" x 3-1/4"
* 5/8" grosgrain ribbon Chocolate Chip #109051 and Regal Rose #109056

Rock-A-Bye Baby
Photobucket

One of a Kind
Photobucket

Ginger Blossom Time
Photobucket

Saturday, January 12, 2008

Getting creative!

My box of new catty goodies came this week!
I finally got them trimmed and have been able to stamp a bit.

Here's a kick stand Easter frame card.
easterPhotobucket

I used pink polka dot patterned paper from Berry Bliss Designer Series Paper and stamped the egg on it. Then I stamped flowers in Close to Cocoa all over the egg. On a floral patterned paper from the same Berry Bliss DSP, I stamped the zigzag in Chocolate Chip, trimmed it out, and glued it on the egg, leaving the left end of the zigzag unglued.

Photobucket

The egg was then trimmed out roughly and glued onto Whisper White cardstock for thickness. I carefully cut around the egg. On a scrap of Whisper White, I stamped the egg in Close to Cocoa. The chick was colored with Chocolate Chip Stampin' Write Marker and Apricot Appeal Stampin' Write marker and stamped into the middle of the egg. The egg was trimmed out and attached to the other egg with a small scrap of Whisper White cardstock. On the inside of the egg, I stamped "You crack me up."


Here's another quick card I put together.
Photobucket

I used mostly scraps for this card. I am low on different pink cardstock, so I stamped the flowers in different shades of pink. I used Boho Blossoms punch for the flowers and the scallop punch for the medallion up on top. The little flower in the middle of the medallion was cut out by hand.

Happy Stampin'!

I've been tagged!

1. My 2 favorite scrapbook topics are: My children and my life.
2. The 2 best places I’ve been to are: Hawaii and Disney World. New York and Japan too.
3. 2 things I do everyday are: Play with my children and surf the net.
4. The 2 things everyone knows about me are: I demo for Stampin' Up! and I teach preschool.
5. The 2 places I wish to visit are: Canada and Europe (Ireland, Austria, Italy, France).
6. 2 things you may not know about me are: I lived in Hollywood for 2 years around the corner from the Mann's Chinese Theater. I used to be a Japanese speaking travel agent for Japanese travel agencies and also worked for American Express SBT.
7. My two favorite foods are: Asian cuisine and Japanese sweets
8. My two favorite musical artists are: Celine Dion and whoever suites the mood I'm in
9. My two favorite characters are: Calvin & Hobbes (I couldn't decide who I liked better) and Pochacco (I LOVE Sanrio).

I am going to tag Carolina and Jan. Please answer the above questions and add one at the end, then tag 2 more people!!

Saturday, January 05, 2008

Days gone by

I started custom scrapbooking for others last year and just finished up my 9th album right before Christmas. Strangely enough, all of the albums I have done are for people who have recently lost a loved one. It gives me a sense of purpose and satisfaction in working with these layouts, knowing how much these albums will be treasured by their new owners.

Here are a few pages from my latest album. I received the pictures and the supplies a couple of weeks before the deadline, but the boys and I were sick for about a good week before I could get started. I had about 5 days to complete this album before having to hand it over. It was a challenge because I had to scrap using specific K & CO paper that was out of stock and no longer being carried at local scrapbook stores or Michael's. My client also wanted elegant and "wallpaper" style layouts... something I am not used to. It was quite an interesting week to say the least. I am pleased with the way the album came together. The finished pages can be viewed on the slideshow that is at the bottom of this blog. I hope you enjoy the layouts! Let me know what you think.

PhotobucketPhotobucket


PhotobucketPhotobucket

PhotobucketPhotobucket

PhotobucketPhotobucket


Cheers,
Jane