I made this Acetate Treat Holder for a tutorial over at Scrapbooking Supplies R Us.
I also made this quick and easy card.

Before you head over to the acetate holder tutorial, I wanted to show you how I colored the pumpkins on the tag and on the card.
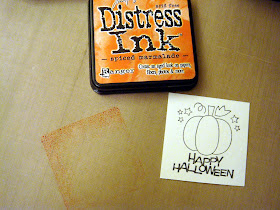
For the tag, I stamped the image on watercolor paper in Staz-On.

I inked up my craft sheet with Tim Holtz Dried Marigold Distress Ink.

Before applying color to my image, I like to "wet" the work surface.

Then I pick up some of the Dried Marigold off of the craft sheet and start "painting" the pumpkin.

Here is the image after several layers of color:

Then I started to "pull" the colors from the pumpkin out onto the surrounding area.
This allowed me to create highlights on the pumpkin and add some color to the watercolor paper.


Here I added some bling with my clear atyou Spica pen.

A quick and easy way to rough up the edges is to simply use your fingernail!

I used Copics on the card. The paper I used is Coconut Swirl (Bazzill).
I used the chiseled end to give the pumpkin a quick coat of Y17.
I used YR04 to add some dimension to the pumpkin...
Then I went back over the entire image with the first Copic, Y17
I used G99 once to cover the stem and leaf.
Then I went over it again to create some shading.

Here's the pumpkin as is:

Here is the same image with a touch of gray all around the image:

Now for the information for the giveaway!
Everything you see on the little card can be yours!
- Copics I used (Y17, YR04, G99)
- Happy Halloween Pumpkin stamp (Hampton Arts)
- a bottle of Spooky Dew Drops
- Boo to You "Monster Mash" paper
- Boo to You "Frightful Friends" paper
- 1 yd of Orange swirl ribbon
Simply go to my Halloween Acetate Treat Holder tutorial on Scrapbooking Supplies R Us.
Scroll all the way down to my signature and click on "Leave A Comment".
Leave me a message there about what you thought of both tutorials (coloring and treat holder) by this Friday (Sept. 25th) and you will qualify for the drawing!
Good luck!!


Fab tutorial and would love to win your fab candy! I am off to comment on blog! Hugs,moni
ReplyDeleteHi Jane, I tryed to sign up, but I couldnt, but need to tell you you are full of ideas and your tutorial for the box is fab! Love it! Hope it count that I commented here! Hugs,moni
ReplyDeleteO M G !!!!
ReplyDeleteGreat tutorial!!!!!
Distress Ink coloring - it's new technic for me!!! I don't have Copics and Distress perfect replacement with it!!! Thank you!!!!!
And thanks for the chance to win your beautiful candy!!!!!
Love your blog!!!!
Another great tutorial, Jane! Wow! Thanks!
ReplyDeleteFabulous tutorials Jane! You are a star to take the time to do them.
ReplyDeleteBy the way, there's something funky going on with your blog. In your right column, there's a string of notices saying Upgrade to Pro today! Bandwidth Exceeded, Photobucket. 7 of them to be exact.
Hugs,
Lisa
Jane,
ReplyDeleteCan you please contact me. I have a question for you and can't find a contact me button on your blog.
Hugs and smiles
Beate
splitcoaststampers
What a great coloring job, thanks for sharing how it's done!
ReplyDelete